A Comprehensive Guide on How to Print Blank Sheet Labels

Blank label sheets allow anyone to create high-quality labels from home or the office. This comprehensive guide will give you everything you need to know to elevate your labels, including best practices for designing and printing.
Keep in mind that there are no set rules for achieving the best results, as each printer may perform just a little bit differently. Feel free to try whatever methods you think will work best, or call us at 1-888-575-2235 for one-on-one assistance.
Jump to Section
1. Select the Correct Label Type and Printer Compatibility
Before printing your labels, ensure they match your printer type. Here are a few tips to help you choose the right label printer.
Know your printer:
Inkjet prints are known for using spray liquid ink, while laser printers produce images that are later rolled through a powdered roller. Because of these different printing methods, labels are specially designed to work with one or the other. Printing your labels in the wrong printer could result in smudges, faded prints, or labels that won’t stick well.
Are you not sure of what printer you have?
Inkjet printers typically use small, liquid-filled cartridges. In contrast, laser printers rely on toner cartridges. If you're unsure, look up your printer model on the manufacturer’s website for details.
Choose the Right Label for Your Product
Before creating your label, you must comprehensively know the different dimensions and sizes your product needs. Below are a few considerations to make when choosing a label.
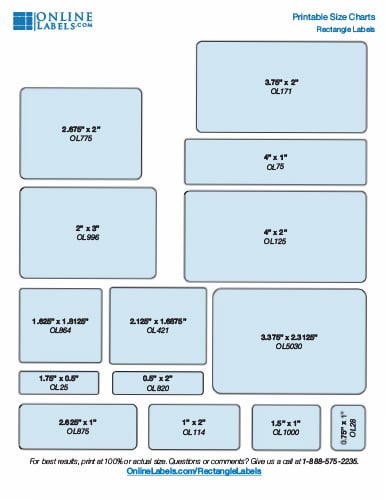
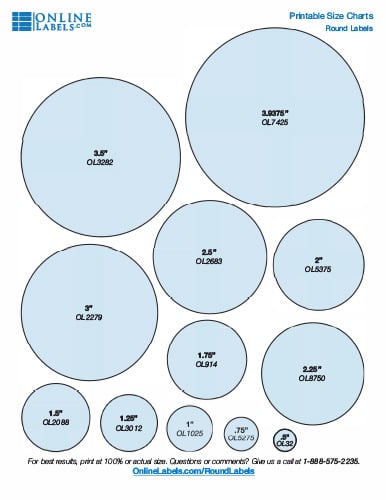
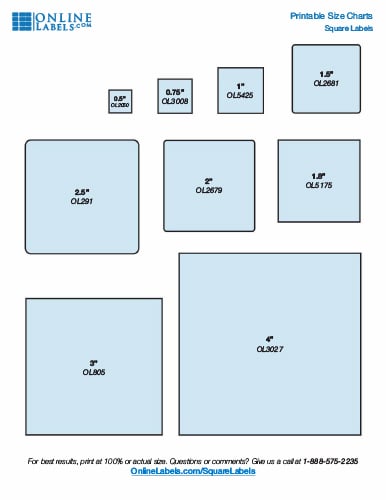
Size and Shape Specifications:
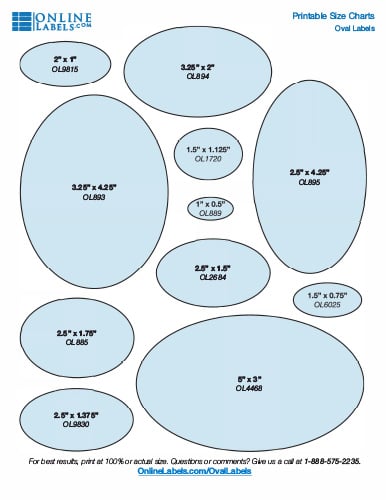
The size of your label can play a crucial role in enhancing visual appeal and ensuring that all necessary information is legible and effectively communicated. Use our label size guides below to find the right label size. Print and cut the sizes and place them on your surface to give you an idea of how a label will fit.
2. Planning and Preparation
Before you load your label sheets into your printer tray and get started, read these tips for the best ways to store and handle your labels.
- Keep your labels in the original packaging until you're ready for printing.
- Store your labels in a cool, dry place to avoid humidity.
- Shield your labels from consistent exposure to direct sunlight or fluorescent lighting.
- Make sure your label sheets are stored lying flat. This will help prevent curling or damage to the sheets prior to printing.
- Hold your labels by the edges to prevent smudging or fingerprints.
3. Design and Templates
Some printing issues can be resolved with changes to your design. Others may be more technical, but design changes can help reduce the visual impact of those problems. With that in mind, here are our recommendations for designing professional-quality labels.
Non-Printable Margins
Most household printers cannot print to the edge of a sheet. You should test your printer's non-printable margins to determine what boundaries you need to observe. Use our non-printable margin tool to do this.
Once you know your printer's non-printable margins, consider how to adjust your design. While you have non-printable margins on all four sides of your label sheet, they may only affect one side of each label. If you want your labels to be symmetrical, you may want to remove any borders or full-color designs. This will help prevent any unprinted sections from looking out of place.
See label design examples that account for non-printable margins.
How to Add Bleed to Your Designs?
You want to add bleed to your label designs whenever possible. Adding bleed means adding extra design past where your label normally ends. This extra design will extend over the edge of your label.
It exists to adjust for paper-shifting – if your label sheets move a little during the printing process, you're less likely to have blank sections on your label.
If you have a border, make it a little thicker. If you're using a background image, see if you can make it bigger so some hangs off the edge. Using a background color within Maestro Label Designer? Maestro Label Designer will automatically add the bleed for you. See label design examples that include bleed.
In any instance, we recommend adding an extra 1/8" past the border for optimal results. If you're using Maestro Label Designer, you can turn on bleed guidelines to see exactly how much that is.
What are Safe Zones?
Safe zones are the internal version of bleed. You don't want any text or critical imagery butting up against the edge of your labels. We recommend you push your design more toward the middle, by 1/8" (0.125"). The space between your text and your label cut is called the safe zone, or safe margins. Turn on safe zone guidelines if you're using Maestro Label Designer.
This doesn't mean your safe margins need to be empty. You can still include imagery, background colors and more – just keep important elements (like text or your logo, for example) out of this space. See label design examples that observe safe margins.
How to Add Circular Shapes to Your Designs?
Circular labels can be the perfect complement to your packaging, product, container, logo, or design. But at times, they can make achieving the perfect print more difficult. With other label shapes like rectangles, small shifts in any direction are only minimally apparent. With circles, a small shift in any direction (or multiple directions) is highly recognizable.
In addition to the tips outlined above, check out specific design examples and advice for round labels.
Pre-Print Procedures
Confirm the loading and feeding instructions for your specific printer. When it comes time to print, this will tell you how to load the labels properly: which side is the front/back and the top/bottom. You can check your printer manual for this information or test it yourself. Listed below are a few things you want to look out for.
How to Work with Load & Feed Directions?
You should figure out in advance whether to insert the label sheets facing up or down. You don't want to print on the side you discard accidentally! As for the feed direction, with most label configurations, it won't matter. Our labels are typically perfectly centered on your label sheet, so your printer's feed direction is irrelevant. But for configurations that have a clear top and bottom, such as heart labels, it's best to know how your printer will handle them ahead of time.
To test these directions, grab a piece of plain printer paper and place it in the printer tray. Write "Up" on the side facing you and draw an arrow from the bottom of the sheet to the top. Print your design and see if it printed on the side labeled "Up" and in the same direction as your arrow. If it didn't, reload a different way and try again.
How to Place Your Labels in the Paper Tray?
Separate your labels before loading them into the printer tray. Label sheets can sometimes stick together, making it hard for them to feed through individually. You should also stack them neatly and evenly in the printer tray so they feed in as straight as possible.
If you printed your labels and something is a little off, the following tips should help. None of these steps is highly technical, but they involve changing computer and/or printer settings. If you have any questions throughout the process, you can always call our customer service team for assistance.
4. Place Design Elements on Your Labels
Printing a label that stands out requires more than a catchy logo or a vibrant color palette. The secret to eye-catching and well-printed labels lies in their design structure, particularly in how you align and space each element. Here are specific rules to follow when designing label templates with perfect alignment and spacing.
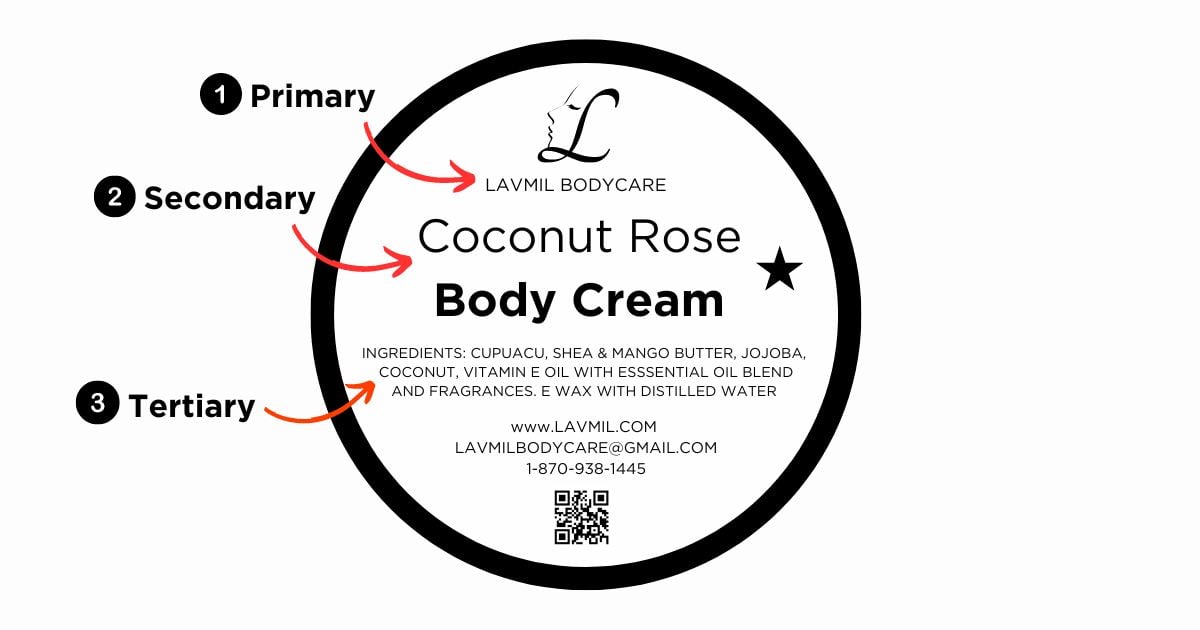
Start with a Clear Hierarchy
Before creating a design, establish a clear hierarchy of the elements in the label. A label has three parts: primary, secondary, and tertiary information, and it's up to the business owner to explain how to design it. For instance, the brand name might be primary, the product name secondary, and additional details like weight and ingredients tertiary. This hierarchy will guide your alignment and spacing choices.
Consistent Spacing and Visual Anchors for Cohesion
Aside from margins, focusing on spacing is critical to a cohesive design. Utilizing equal spacing between similar elements, such as visual anchors, can help draw the spectator's eye to the design. These elements can include borders, lines, or contrasting blocks of color that can help define sections and produce unity.
Design tip: Once all the elements in a design are correct, print a mockup to see how it looks in real life. This will help you see if the result creates a seamless experience for the audience and allow you to make any necessary changes before you print your labels.
4. Setting up Your Printer
It's time to prep your printer once your design is ready to print. Check your printer settings for the following before clicking print:
- Page scaling: set your printer page scaling to 100% or "Actual Size." This will allow your labels to print at your desired size.
- Loading label paper: it may sound straightforward, but loading your label sheet incorrectly into your printer can lead to misalignment. First, ensure your sheet is facing the right direction. Most printers include an indicator on the tray telling you which direction to place the labels. Some materials, like our weatherproof polyester for laser printers, may also require you to feed labels manually into the tray to avoid static buildup.
- Adjust your printer paper setting: epending on your material, you may need to change the paper type from your printer dialog box. This guide will help you find the right printer paper setting for your label material.
5. Decide What Platform to Use To Print Your Labels
Before you start printing your labels, it’s essential to decide which platform or design software you’ll use to design and format your labels. Whether you're printing in Word or our platform, Maestro Label Designer, we've covered you with several guides. The right platform can make the difference depending on the creative aspect you want to focus on. At Online Labels Group, we offer several guides for different platforms, including:
Maestro Label Designer Printing Guide
How to Print Your Adobe Illustrator Label Design
How to Design Stickers on Procreate
How to Design Stickers in Canva
How to Create a Microsoft Word Label Template
6. Handling Your Labels After Printing
Handling labels carefully can help you avoid smearing and loss of adhesive properties. Follow these guidelines for best results:
- Clean hands: wash your hands and keep them clean before applying your label. Ensure the labels are peeled gently to prevent tearing or damage to the edges.
- Apply carefully: place your container on a smooth, flat surface and apply your label from the middle. Work your way around to the outside of the label, smoothing out any bubbles along the way.
Quality Control
After applying labels, a quality control check must be done to ensure each label is aligned with the products. Implement these checks:
- Inspection: visually inspect each labeled product for alignment and design.
- Adhesion test: gently rub the edges of the label to ensure they are fully adhered and not peeling.
7. Printer Troubleshooting Tips
Alignment Issues
If your design is printing in the wrong place on your label sheet, you are likely experiencing alignment issues. We go more in depth into this topic in our Printer Alignment Guide article, but the summary below is a good jumping off point.
Page Scaling
This problem only affects users printing from PDF documents.
Problem: None of the labels on your sheet are in the right spot, they're all off in different ways.
Explanation: Some PDF viewers have a default setting that shrinks a document to fit "properly" on a 8.5" x 11" sheet. Our templates are already sized to fit correctly, so this setting may do more harm than good.
Solution: Tell the program not to adjust your template. Hit print again but before continuing, review your settings. Make sure that your document is printing at actual size or 100% scale. You don't want "auto rotate and center" or "resize page to fit printer margins" to be selected.
If you don't see these options, your default program may not offer them. In that case, we recommend installing Adobe Acrobat Reader DC. It's a free program with a simple 5-step installation process. Read our step-by-step instructions.
Uniform Misalignment
Problem: Each design printed uniformly too high/low or left/right from the labels themselves.
Explanation: Your printer is feeding the label sheets too fast or slow and/or the printhead is registering the start position too far to the left or right.
Solution: Adjust the margins of your document so your designs match up with the printer's start position. Grab a ruler and find out how far your design is off in each direction. Then, click into "Page Setup" within the "Print" menu in your design program. If your design is too far left, add your measurement to "Left." If your design is too far right, subtract your measurement from "Left." If your design is too high, add your measurement to "Top." If your design is too low, subtract your measurement from "Top."
Smearing/Smudging
Problem: Your design isn't adhering to your label sheets, it's smearing on contact.
Explanation: If you're using an inkjet printer, too much ink is being dispensed onto the page. If you're using a laser printer, the laser temperature isn't strong enough to fuse the toner to the label facesheet.
Solution: For both inkjet and laser printers, adjusting the material setting should help. First, open your printer dialog box and click "Advanced Options." Select the dropdown for "Paper Type," "Type Is," or "Material Type." Switching to "Photo/Glossy" may work, or find the exact setting we recommend.
Non-Printable Margins
Problem: The designs on the edges of your sheet are cut off.
Explanation: Printers can't print on every inch of the sheet, there's always a border around the sheet that it can't reach. Your label design may be outside the printable area in what we call the non-printable margins.
Solution: Modify your design so the non-printable margins aren't noticeable. See the non-printable margins section above for specifics.
Text & Images Outlines
This problem only affects users printing from PDF documents.
Problem: Your design has lines running through it or it looks as if there are squares around some of your graphic elements.
Explanation: PDF viewers can't process all fonts, images, and/or graphics.
Solution: Tell your PDF viewer to read the entire document as an image. Open your printer dialog box and click "Advanced Settings." Check the box next to "Print as Image."
Paper Jams
Problem: Your label sheets keep jamming inside the printer.
Explanation: Jamming isn't a clear-cut science, but it could be a result of thicker-than-normal paper (label sheets) moving through your printer at the standard speed.
Solution 1: Change your material setting. Open your printer dialog box and click "Advanced Options." Select the dropdown for "Paper Type," "Type Is," or "Material Type." Switching to "Labels" may work, or find the exact setting we recommend.
Solution 2: Clean the rollers within your printer. You can test this possibility by printing a blank sheet of printer paper. If it comes out with streaks, your feed path is dirty and could be affecting how well your sheets move through the printing process. Look to your printer's manufacturer for cleaning and maintenance instructions.
Solution 3: Try a different paper tray. The manual feed tray or bypass tray typically include a straighter path through the printer so there are less chances for your label sheets to jam.
Achieving Flawless Label Printing
Label printing can be a simple yet strategic process. Paying attention to the details and following the steps outlined can help achieve professional, precise, and perfectly aligned labels every time. Remember, the quality of your blank labels reflects the quality of your products, so investing time and effort into your printing process can help enhance the brand's image and operational efficiency.
Do you prefer to have your labels professionally printed? Explore our custom labels and custom stickers printing services.
