How To Design Bath Bomb Labels That’ll Stand Out

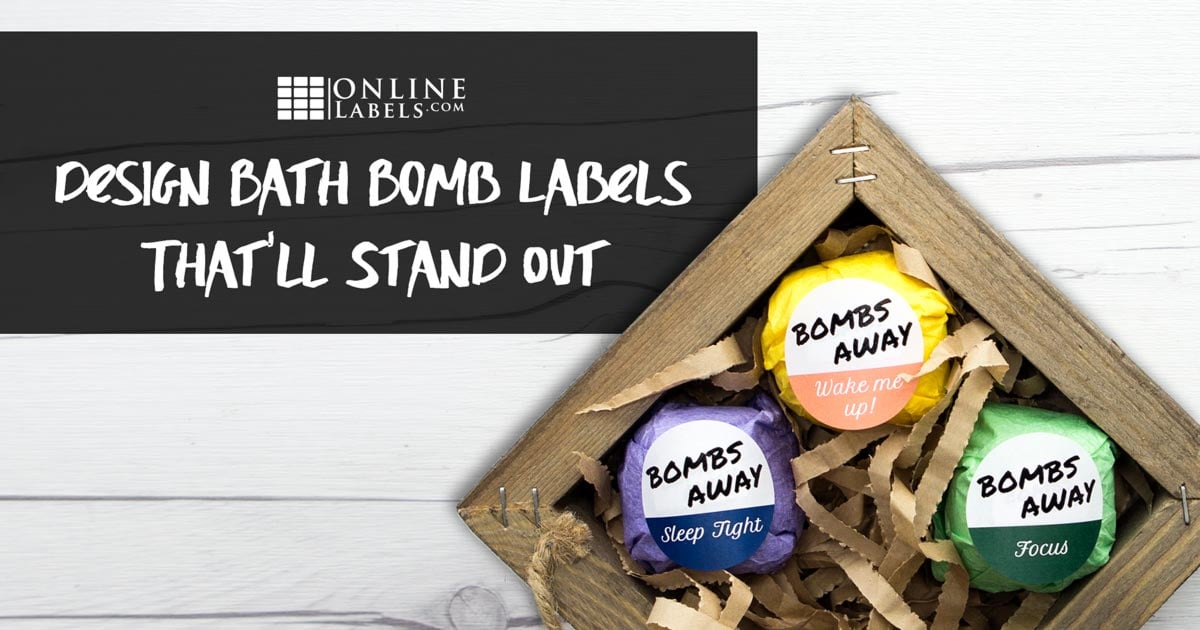
With so many bath bomb products on the market, it’s important for yours to stand out. One way to do this is by creating beautiful, eye-catching bath bomb labels.
You may wonder, "Why even bother? Let the product speak for itself." But in reality, if a potential customer isn’t initially intrigued by how your product looks, they’re not likely to buy. Labels not only communicate your brand and style, but also flaunt the benefits and unique characteristics of your product or brand. They could be the difference between a customer and a viewer.
In this article, we’ll help you design labels that’ll attract customers, meet FDA guidelines, and look great against your bath bombs.
Understand Your Brand
Your bath bomb labels contribute greatly to a brand positioning strategy — creating a brand association in the minds of customers to make them perceive your brand a certain way. So, your labels should be unique to you and your brand, and should differentiate you from competitors.
If you haven’t already determined a brand identity, here are some questions you can ask yourself to get you started:
- What is your "why?"
- Who is the ideal customer?
- What’s the story behind your business?
- What are your values?
- How does your product benefit customers?
- How is your business different?
- How do you want customers to describe their experience?
Once you have a brand identity, take what’s unique about it and try to showcase that in your labels. It’s also helpful to determine what colors, fonts, and other design elements you want to tie into your brand, then use those consistently in all of your labels and other marketing collateral. What’s most important is remembering how you want customers to perceive your brand, then designing your labels to support that.
Choose Your Packaging Style
It’ll be difficult to design your labels without having a packing style nailed down. How will you package your bath bombs?
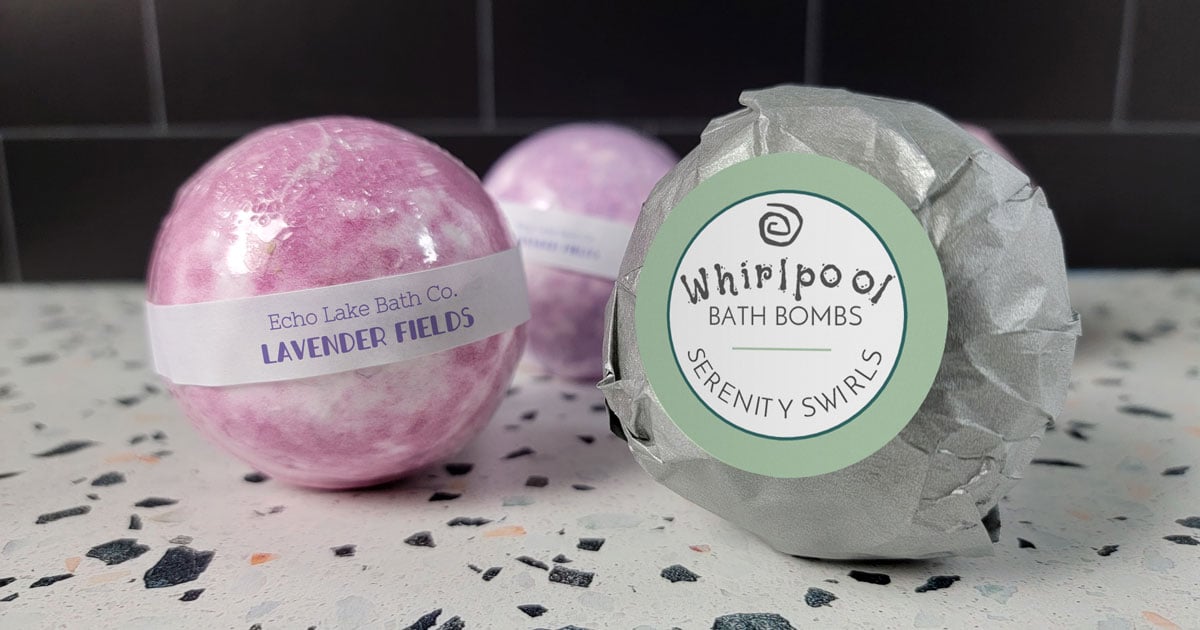
Individually Wrapped
This is popular choice for selling individual bath bombs, and it allows you to create unique labels for different bath bomb products, which can go a long way for your brand. You can even use your wrapping material to support your brand. For example, if you want to highlight a natural or organic element of your brand, using kraft paper would be a good idea. You can also use plastic, shrink wrap, or colored tissue paper.
You can also use any shape label to seal the wrapping material, which gives you lots of creative freedom. Go with a simple shape, something more decorative, or even a wrap-around/ belt buckle label.
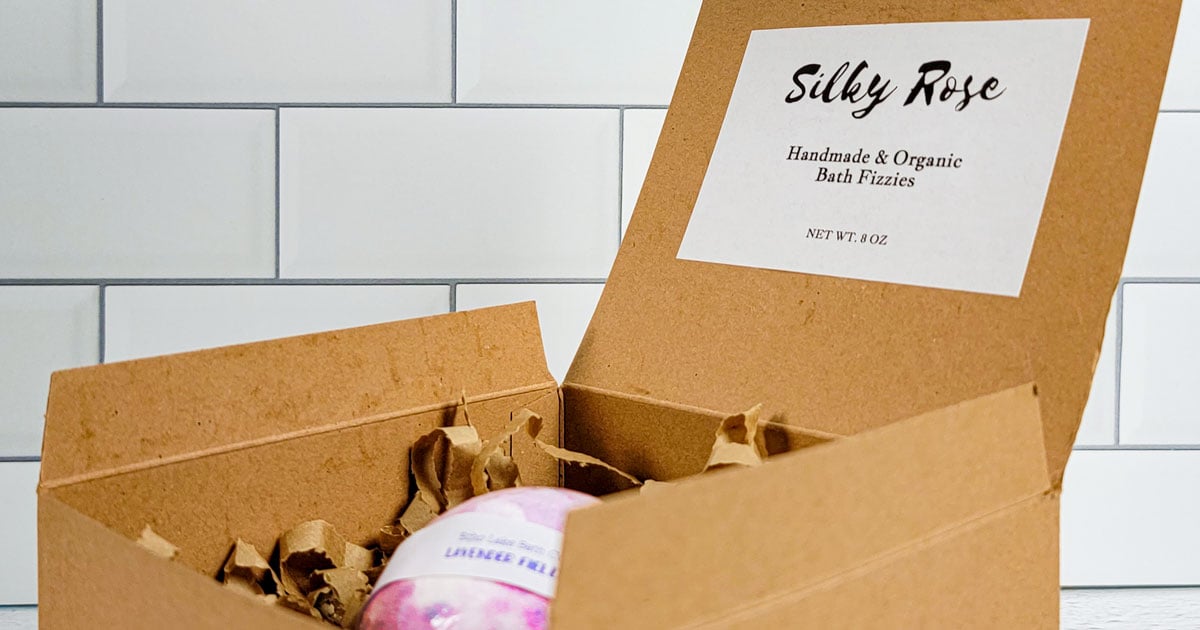
Individual Boxes
Like with the previous method, you have total freedom here! Use whichever shape or size label works for you and stick on the outside of the box, or use it to seal the box shut. Get creative with the box type you choose and tie it into your brand — use boxes that are plain white, clear, kraft, or even colored.
Going this route also opens up the opportunity to use add-ins (think kraft confetti, packing peanuts, "thank you" cards, etc.), for a memorable unboxing experience.
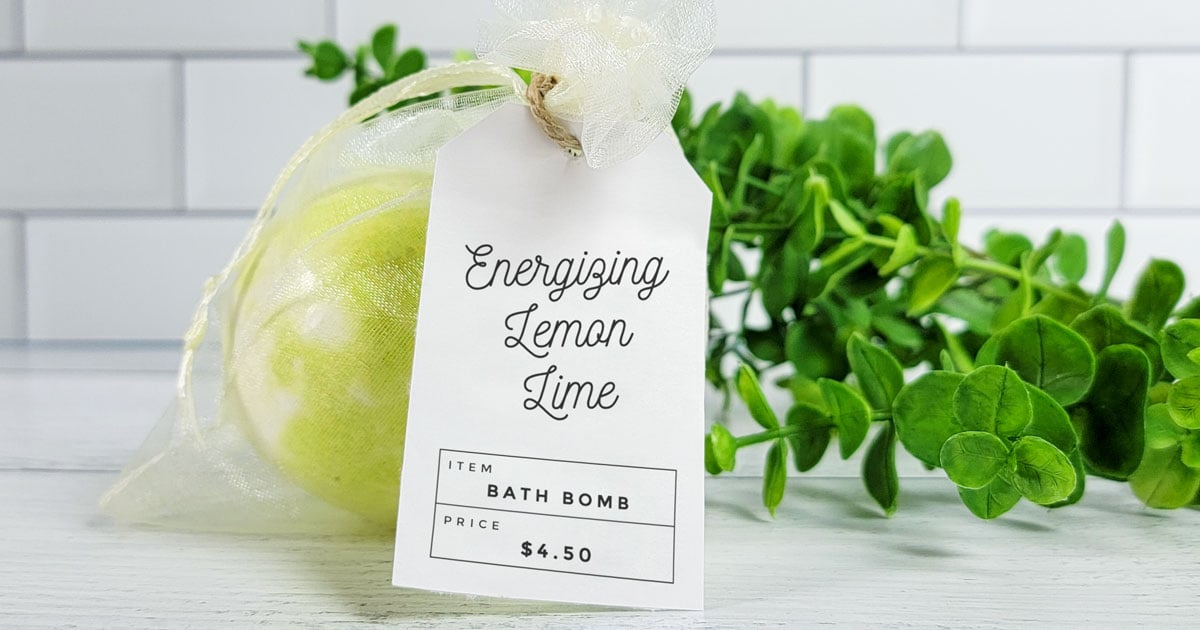
Sheer Bags or Plastic Pouches
Another good option for selling individual bath bombs is to put them in individual bags, then secure them with a tag. A tag label would work best for this method, since a regular adhesive label won’t adhere great to a scrunched up bag. Just grab any shape cardstock tag, stick a label on it that fits, and use twine or another material to tie it around the next of the bag.
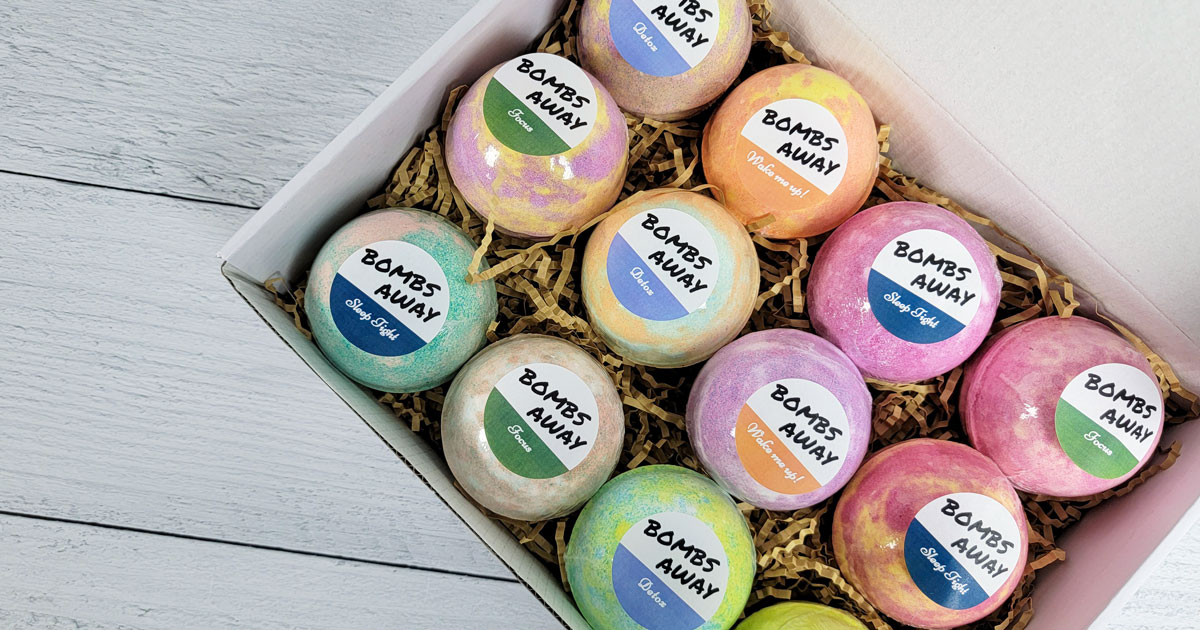
Boxed Set
When selling bath bombs in a set, the best way to package them is in a shallow box. Get creative with inserts and protective packaging, and use a branded label to seal the outside. For identifying the bath bombs, add a printed key, describing the scent and name of each bath bomb in the box, or individually wrap each one and seal with a label. Do whatever works for you!
Determine What Information Will Be on Your Labels
Before you start designing, lay out all of the information you want on your label(s), and what needs to be on them. This gives you a good idea ahead of time of how you should be sizing design elements to make sure they all fit nicely on your label.
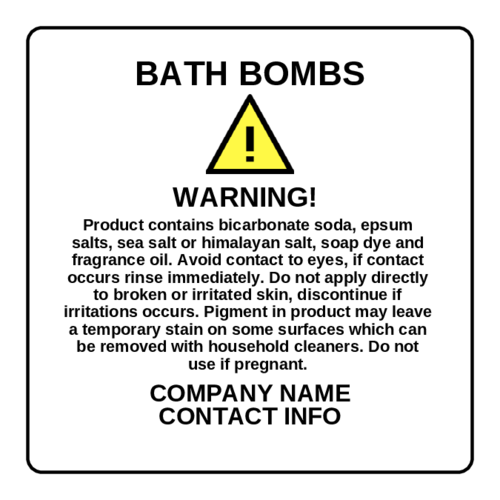
So, what needs to be included on your label? No matter where you’re selling products, it’s good to play it safe. To figure out what information your label must have, you’ll first need to familiarize yourself with the FDA (Food and Drug Administration) guidelines. The FDA classifies personal hygiene products as either a cosmetic, drug, or both.
According to the FDA, cosmetics are defined as, "articles intended to be rubbed, poured, sprinkled, or sprayed on, introduced into, or otherwise applied to the human body...for cleansing, beautifying, promoting attractiveness, or altering the appearance." Bath bombs are used for cleansing and beautifying, so it’s safe to say they fall under the cosmetics category.
To comply with FDA guidelines, the following information needs to be on your label:
- Name of the product (bath bomb)
- Net quantity of contents
- Directions for safe use
- Warnings
- Ingredients list
- Business information
Now, we know that’s a lot of information to include on just one label — but you can get creative! Use more than one label or go with informational inserts in your packaging. Play around with font sizes and the composition of your artwork. You can include all of this information on a label and still get the look you envisioned. For more in-depth information about properly labeling cosmetics, check out our article on FDA labeling requirements for cosmetic products.
If you want to so a separate warning label, check out our free bath bomb warning label templates:
Design Your Labels
Now that you have a good understanding of your brand, picked out your style of packaging, and know what information you want to include, it’s time to get designing! Here are some tips to get you started.
Choose Your Label Material.
This is important to have picked out before you start designing. Colors look different or may not not show up well when printed on certain materials. For example, colors printed on a clear material will print transparent, so they may need a white underprint. To get a white underprint, you’ll need to order custom printed rolls. Learn more about how to set up a white ink printing.
A white material with either a gloss or matte finish is a popular and reliable choice, and any colors you go with it will pop. Depending on your brand identity, a more unique material like brown kraft, clear, or even metallic could be fun too! Just make sure whichever material you go with will look good against your container or bath bombs. We recommend requesting some samples of a few materials and seeing which looks best.
Choose Your Design Program.
There are so many design services available, with many even being free! With any purchase from OnlineLabels.com, you get access to our premium design software, Maestro Label Designer. It’s compatible with all of our products, so you can see exactly how your design will look on the label shape you chose. In Maestro, you can import a blank template and design from scratch, or start with a pre-designed template.
Start With a Template or Use One for Inspiration.
All of our templates are professionally designed and are fully customizable. Choosing one of these templates can be a great jumping off point if you just have no idea where to start. You can simply edit the text to make it match your business and product information, or open in Maestro where you can rearrange elements, resize, change the label shape, change colors, add elements, and more. Or if you just need some inspiration, browse our templates and see if any light bulbs go off!
Going along these same lines, you can always do a simple Google search to see how other brands design their labels, and use them as inspiration. This is especially helpful if you’re experiencing a creativity block. Just make sure you don’t copy anyone, and make something that’s original to you.
Add Visual Interest.
Your labels need to be visually appealing and attract the eyes of customers. As you create your design, remember that the name, color, and overall style of your labels should help customers figure out which one they want to purchase and why. Here are a few design tips:
Graphics and Patterns
Funky patterns, elegant prints and backgrounds, brush strokes, and more can go a long way and will immediately draw attention. When you create your own distinctive look with graphics, customers will easily be able to differentiate your product from competitors. Make sure you keep your brand and audience in mind as you choose graphics and patterns. For example, if you want to communicate that your products are soothing and natural, maybe a crazy pattern that hurts your eyes isn’t the best choice.
Colors
Play around with colors. Mix and match different ones and see what combinations you like — but definitely incorporate your brand’s colors in there too, even if it just appears on your logo. Use colors that will match your brand identity, for example, earthy tones to highlight organic characteristics, pastel colors for soothing, and black and white for a luxury feel.
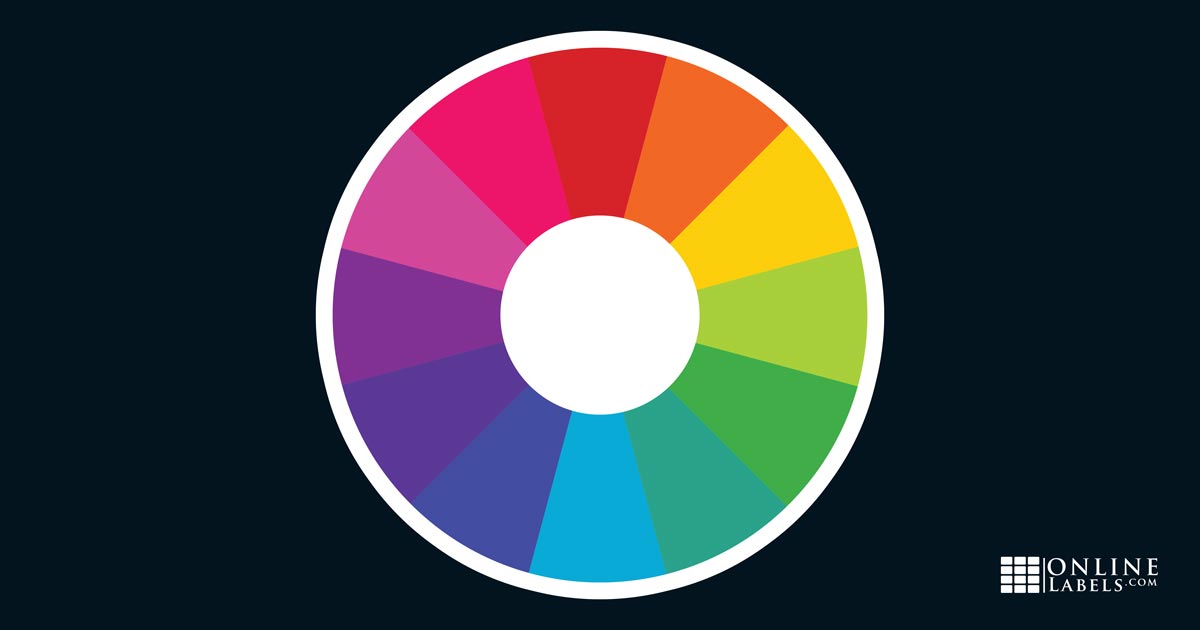
Here are some color schemes that create visual interest to get you started:
- Complementary colors: colors on opposite ends of the color wheel, like yellow and purple. Since they’re opposites, they have the effect of making each other pop.
- Split complementary: instead of two opposing colors, it splits one of the colors into 2. For example, purple, yellow-orange, and yellow-green. These have the same effect as complementary colors but give more flexibility when designing.
- Analogous: colors near each other on the color wheel. For example, red, orange, and yellow. Analogous colors create a soothing and visually-pleasing effect.
- Monochromatic: multiple shades of one color. For example, light green, green, and dark green. These color schemes can be very aesthetically pleasing.
Different Fonts
Choose a font or combination of fonts wisely, as they can change the whole look and feel of a design. Think about what type of font is the most appropriate for the message you want to send. Do you want something quiet and sophisticated? Or loud and playful?
Steer clean or mixing clashing fonts, or too many different fonts. You probably don’t want more than one loud and playful font per design. Unique fonts are great for headlines, as customer’s eyes will automatically be drawn to what stands out.
Composition
Plan for white space in your design and don’t cram too many elements in or too much text. White space is vital to any good design, as it allows viewers to navigate through the artwork and have room to make sense of things. White space allows you to group elements together and isolate important ones.
Use sizing to strategically lead your viewers through the design. Vital information should be more noticeable than less important details. For example, make a headline the largest text block in the design so it catches the attention first.
Despite all the steps and tips talked about in this article, designing your bath bomb labels should be a fun experience. Just trust the process and take your time! We hope this was helpful to you, and happy designing!
