How to Prepare Your Label Artwork for White Ink Printing

In order to provide you with the best quality prints, we require custom label artwork using a white underlay to include a white ink layer. In this article, we’ll walk you through how to set up a white ink layer in your artwork using either Adobe Illustrator or Photoshop.
What is a white underlay?
A white underlay (or underprint) refers to the process of printing an initial layer of white before applying the artwork print.
How does it work?
Your purchase of clear custom roll labels includes a white underlay. This allows your label design to be completely visible and opaque on the clear material. In order to apply the underprint to your labels, we require a white ink layer in your artwork.
How To Prep a White Underlay for Your File
To begin, open your artwork file. If your artwork is mostly or all vector, use Illustrator. If your artwork is raster or an image, use Photoshop. (Read through the end of this article to learn more about vector and raster artwork.)
Adobe Illustrator
If you're working with an Illustrator or other vector file:
- Ensure that the color mode of the document has been set to CMYK. File -> Document Color Mode -> CMYK Color.
- Make sure all linked files are embedded and fonts are outlined. Go to the Links panel and select all the images. In the drop down menu select "Embed Image(s)". To outline, select all the text then go to Type > Create Outlines.
- Duplicate the objects from your artwork that you want backed with white on a new layer and name it "White Ink". Make sure this layer is above your artwork layer.
- On the White Ink layer, expand fill and strokes on all vector artwork. For images, use the pen tool and draw a vector shape around the areas that you want to be backed in white. Once you have your vector shape drawn, delete the remaining image.
- Create a new white color swatch so you can see what areas will be backed in white and name it "WhiteInk."
- Select all vector artwork on the White Ink layer and fill it with the spot "WhiteInk" swatch.
- In the layers panel, select the White Ink layer then go to the transparency panel and set it to darken.
- Review your artwork to make sure all areas that you want backed in white are darkened with your "WhiteInk."
- Save your file as a PDF in "Illustrator Default" with the default settings.
Adobe Photoshop
If you're working with a Photoshop or other raster file:
- Convert your image to CMYK color mode. You can find this option under Image -> Mode -> CMYK color.
- Choose the areas of your artwork that would need white ink printing.
- Go to Window -> Channels to create a new channel. Fill the areas you selected with blank. You can do this by going to Edit -> Fill.
- Double click on the newly created channel. Indicate that it's a spot color. You can name it "White." CMYK colors will be added on top of this channel.
- When you're ready to save, go to File -> Save as. Save the file as a PSD or Photoshop PDF. Make sure all links in your artwork are embedded.
- Submit the PSD or Photoshop PDF to us.
What’s the difference between vector images and raster images?
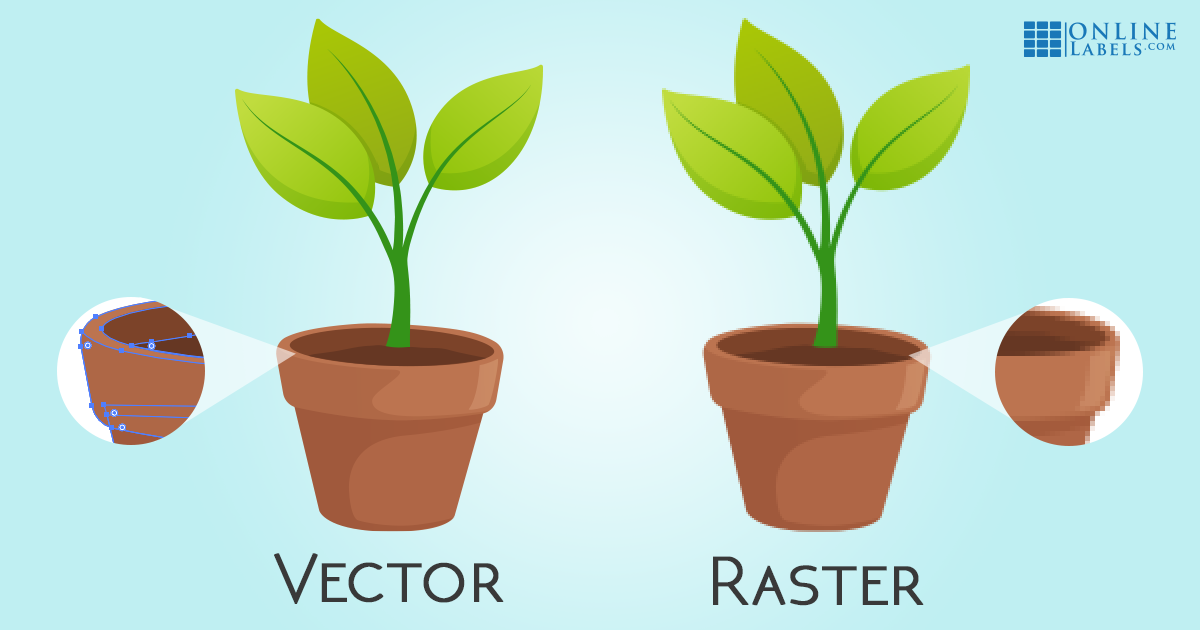
Vector artwork uses mathematical formulas to create shapes. Vector files are typically used when the artwork needs to be scaled without the loss of quality.
Raster images are composed of a set amount of pixels, or tiny colored dots, to create the image. When the image is scaled, the computer has to make up information, causing a low quality blurry or pixelated image.
Once your artwork is converted, you're ready to submit your custom printed roll artwork! If you have any more questions, please reach out to our support team at 1-888-575-2235.
