Die-Cut vs. Kiss-Cut Stickers: Which You Should Use To Promote Your Business

Using custom stickers is a fun and trendy way to promote your business. So if you don't have promotional or brand stickers yet, this is your sign to make them!
If you use or are considering using stickers in your business marketing, you’ll have a fundamental decision to make: Should you use die-cut or kiss-cut stickers?
Need sticker paper? Shop our sticker paper collection.
What's the difference?
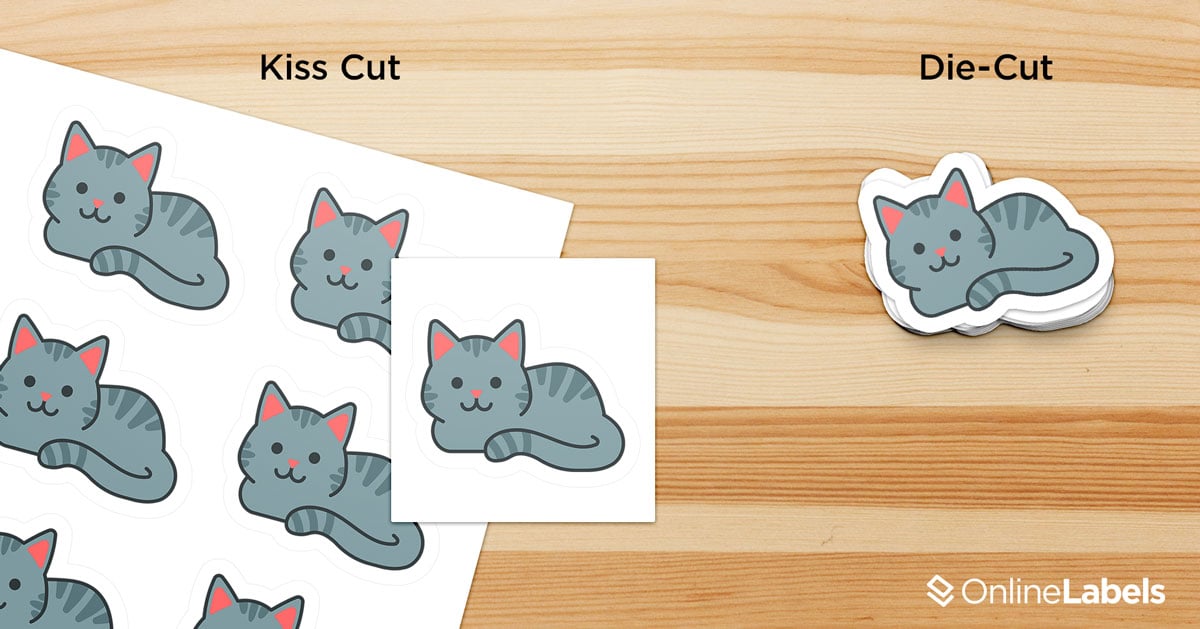
Luckily, the difference between die-cut and kiss-cut stickers isn’t complicated:
Die-cut stickers are cut through both the sticker vinyl and the paper backing, so that the paper backing of the sticker is the same exact shape as the sticker design.
Kiss-cut stickers are cut only through the sticker vinyl, so that the paper backing remains intact. This means kiss-cut stickers have a paper backing that’s larger than the sticker, typically in a rectangular shape around the sticker.
As you can see, the difference between die-cut and kiss-cut stickers is only before they’re peeled and applied. In fact, the same sticker can be printed as a die-cut and as a kiss-cut and will look exactly the same when peeled from the paper backing.
So, when should you order die-cut or kiss-cut stickers? That’s the real question we’ll answer here.
When To Use Die-Cut Stickers
Die-cut stickers have a paper backing that’s cut in the same shape of your design. This immediately creates an appealing, eye-catching design, making it a popular choice for people looking to make an aesthetically-pleasing first impression with their stickers.
You might prefer to use die-cut stickers if:
- You have unique logos or artwork you’d like to be put on display, and the custom sticker cut will help your design immediately stand out.
- You or your customers would prefer to know what the sticker will look like upon application, before peeling the backing.
- You’re on a budget and would like to save money. Die-cut stickers tend to be lower cost because you can print more on one page and there’s less cutting per sticker.
You might not want to use die-cut stickers if:
- Your sticker design has delicate edges that can be frayed or damaged during transportation and handling (in this case a kiss-cut backing can protect your sticker’s edges).
- Your sticker design has complex, finely detailed edges that will be difficult to peel away from the die-cut backing.
When To Use Kiss-Cut Stickers
Kiss-cut stickers have a paper backing that’s larger than the sticker, usually cut in a rectangular shape. This makes it a great choice for people looking for a more practical, durable sticker.
You might prefer to use kiss-cut stickers if:
- You need a sticker that’s easier to peel, either because you need to quickly peel lots of stickers or because your design has complex edges that would be difficult to peel from a die cut backing.
- You have a delicate, intricate sticker design that needs to be protected - the larger backing will help protect your sticker during transportation and handling.
- You’d like extra room around your sticker to print extra design detail or information, like your website domain, social handles, promotions, giveaways, and more.
You might not want to use kiss-cut stickers if:
- You’re on a budget - die-cut stickers tend to be more budget friendly because there’s less cutting involved.
- You’re prioritizing a standout design look. Because of the larger backing, it can be more difficult to visualize a kiss-cut sticker’s final design appeal.
How To Create Your Custom Die-Cut Or Kiss-Cut Stickers
You can easily create your own custom die-cut or kiss-cut stickers using our OnlineLabels printable sticker paper with your own electronic cutting machine.
What you’ll need:
- An electronic paper cutter, like the Silhouette Cameo®, Cricut Explore®, or Brother ScanNCut®.
- High-quality sticker paper, available in 37 different materials.
- Design platform, such as Maestro Label Designer, Silhouette Studio®, Cricut Design Space™, or the platform of your choice.
Steps to creating your stickers:
- Create your design in Maestro Label Designer or the design platform of your choice.
- Load your sticker paper into your desktop printer.
- Print your design.
- Run the printed sticker paper sheet through your electronic cutting machine to create your custom sticker shapes.
- Remove your sticker paper from the cutting mat.
Recommended cut settings:
Different electronic paper cutters and materials will require different cut settings. To save you from wasting time and money trying to figure out settings yourself, we’ve created a Sticker Paper Cut Settings Guide for the most popular cutting machines on the market. Simply find your machine and click on it to be taken to a table that contains the proper cut settings for each of the sticker paper materials we offer.
Alternatively, you can get your die-cut stickers created and printed by us! It's as easy as choosing your sticker shape, size, material, finish, and quantity, uploading your artwork, then approving a digital proof!
Start Creating Your Own Die-Cut Or Kiss-Cut Stickers!
We hope this guide has helped you navigate the decision between die-cut or kiss-cut stickers. Whichever you choose, you can be sure that your stickers will make a lasting impression!
If you’re looking for more inspiration, check out our articles on How To Make Custom Stickers and Marketing Your Business With Stickers.
Stickers offer a whole new world of marketing possibilities. We hope we’ve helped you feel confident to explore them all! Get started today with our premium sticker paper or with custom die-cut stickers.
